
Have you ever considered making your garage into a:
Cozy Hangout Spot
?!?!? If so, you’ve probably seen the garage updates that caused you to feel like….
“That’s nice, but I’m not handy!”. Basically, you cataloged the effort as Team Too Much and did nothing. Well, you have come up on a post that might just have you thinking that transforming the garage does not require doing the absolute most!
I have recently transformed my 2 car garage into:
The Creation Cave
A spot for my kids to really turn up without me having to tell them to turn down the volume (as often).
Before we go further you need to know this about my personal setup:
- I do not own land at this property.
- I have a landscaping service (not requiring me to keep typical “homeowner” tools, such as snowblower, lawn mower)
- I do not have a basement.
- I value preparedness, but also am a minimalist.
- I am required to keep my large curbside trash and recyle bins in the garage on non collection days
- I have an under stair storage room for items such as bike, suitcases, and emergency water stash.
- I store my out of season and prep items creatively within my dwelling space, The Billionaire Bubble. Example: I have a storage couch – where I keep my winter clothing, tools, weights. My daughters toddler bed is elevated on top of 3 storage containers that are hidden by a sheet so it looks like a bed skirt. My interior closets have MRE buckets for if ish hits the fan.
Whether your setup is like mine or not – I want you to be aware of the parameters I have worked within to bring my vision to life. My resourceful storing methods and not having to keep lots of outdoor on hand items has given me more space to be free in how I update the garage.
Let’s move on.
Prior to being in this space I lived in a suburban home. I had land, a 2 car garage (that was rarely parked in), and a large finished basement with an unfinished zone for lots of storage. I moved into a spacious luxury townhome with very little and started over. My 3 children and I are used to not being on top of each other and being able to spread out. Thankfully, God has made it so that we still have that setup at The Billionaire Bubble. There is a room right now that is currently just holding bins – and I am thinking of how to use it.
The Billionaire Bubble may be considered by some as a “downsize”, I see it as an invitation to tap into new levels of creativity for my inevitable, quickly approaching – global launch. #catapult #tothemoon #tomars #infinityandbeyond #firstclass #oceanviews #yacht
(Mini rant commercial break over…for now 😉 )
My boys love playing on their Virtual Reality headsets which requires space and apparently, loudness. I quickly learned that we were going to clash with them doing all that in the family room. So I began to send them to the garage. My car would be parked on one half and one of my boys would use a quadrant on the other side to play VR. This started in the winter and was cooler in there, which was something my boys welcomed.
Not long ago, I noticed that my neighbor was parking outside of his garage, and was using the garage as a storage and office space. Him and his wife have a small business. I thought – this is a great use for that garage space. I actually was a little bummed that he implemented this immediately when he moved in as this meant his garage floors had none of that car gunk, like mine.
Shortly after, I decided to stop parking in the garage and to take full advantage of a nearly 400 sq foot space.
Taking this dream and bringing it into reality required very loose planning on my end.
I did not go out and purchase all new stuff. I used furniture that had on hand, storage that I picked up from free, thrifted some furniture, and bought new items. Before you embark on this journey for yourself – know that you don’t need to go buy a bunch of new stuff! You also can transform slowly over time, just like you do your life.
Little by little you elevate.
As I had been parking on one side and we had been walking with shoes on – on the other half. The garage floors needed to be cleaned. I purchased an outdoor broom and a outdoor scrub brush to get gunk and debris out the garage. We did this to the best of our ability. I didn’t do this alone, my boys (age 12 and 9) got to work. They wanted the perk of transformation – so they were required to contribute. We were moving items from one side of the garage to the other…moving some items indoor to clean the floors to the best of our ability.
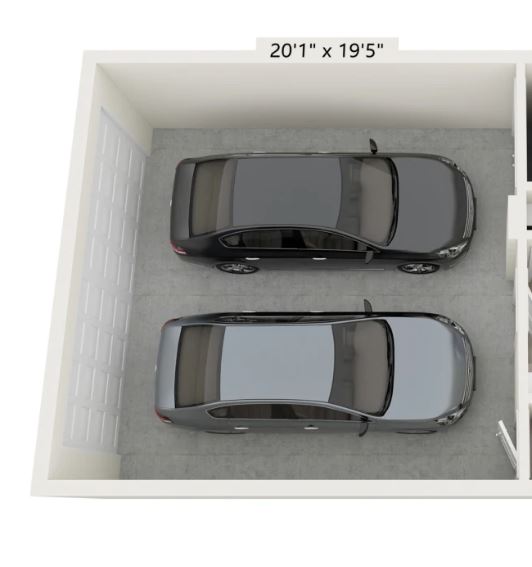
I gave my boys the assignment of measuring the garage so I could get an idea of how many:
Gym Floor Mats
to order. I didn’t use the garage floor plan image I included above – hadn’t even crossed my mind at the time – to look at the floor plan. Welp, let’s charge the measuring that the boys did, to a team and character building moment.
As the one with the vision and doing the spending, I had the boys do the majority of the mat laying.

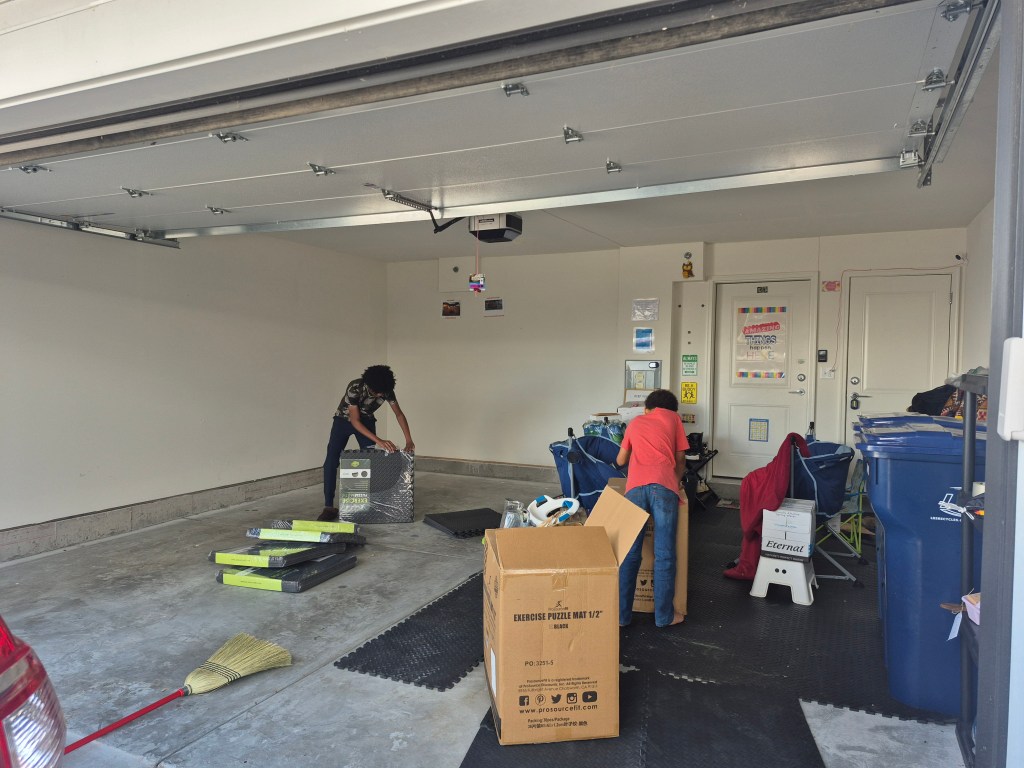
I came in at the end to get tricky spots. Here is what the garage looked like after the majority of the floor mats were laid.
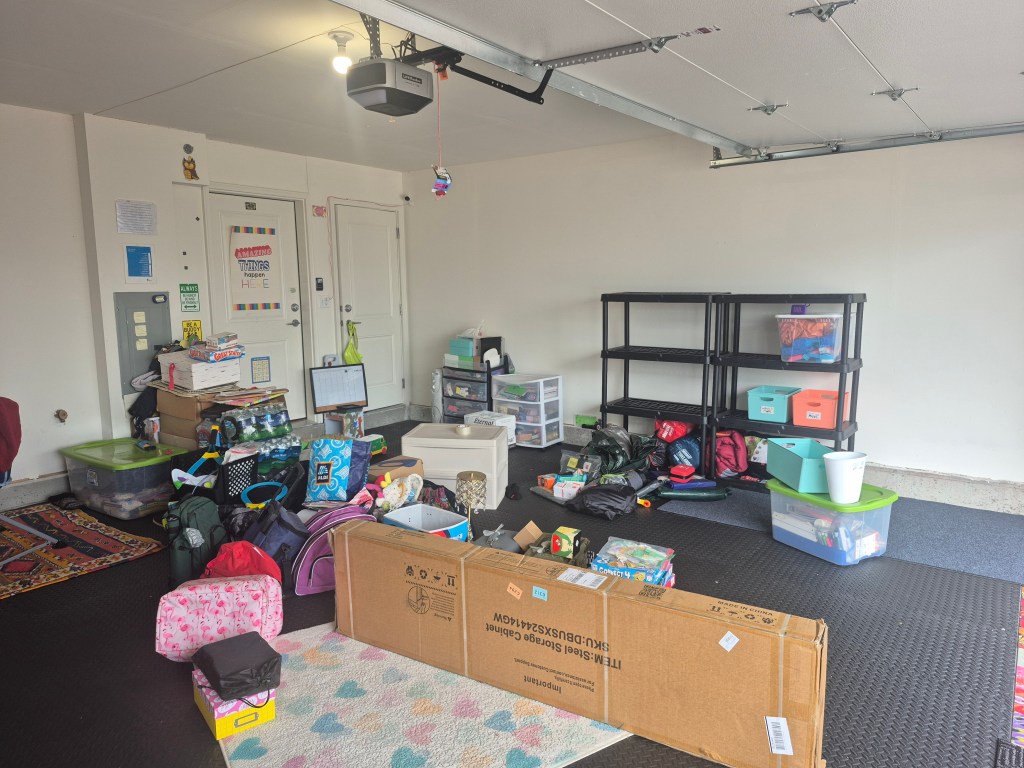
As you can see, there still was a bit of clutter after laying the gym floor tiles! Those black shelves you see – were purchased from Menards and built by my boys. That large brown box contained a tall vertical storage cabinet that I purchased from Amazon. Upon receiving it, I immediately ruled out building it myself and sought to get a handyman. I had a couple peeps encourage me to try it myself – still I went the handyman route. It didn’t work out – so I sought the help of a neighbor. We ended up building the storage cabinet together in about an hour! Once that was built I was able to get rid of the smaller storage shelves along the wall. I also gave a bunch of stuff away.
Lo Tip: If you’re looking for free items or ever want to give stuff away – consider looking for a local free giveaway group on FB. I’m in one one and have been blessed by it and also a blessing to others!
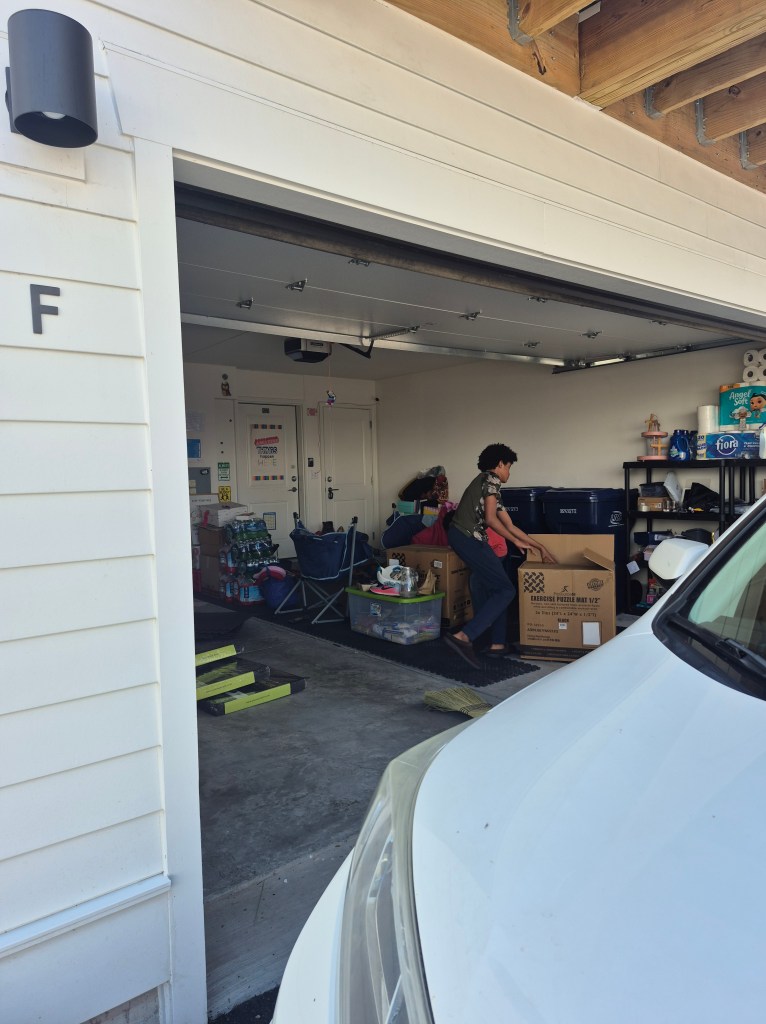
Here is what the garage looked like after the tall storage cabinet build and decluttering.
I easily could’ve stopped here because this is already a huge improvement from a concrete garage floor with no seating.
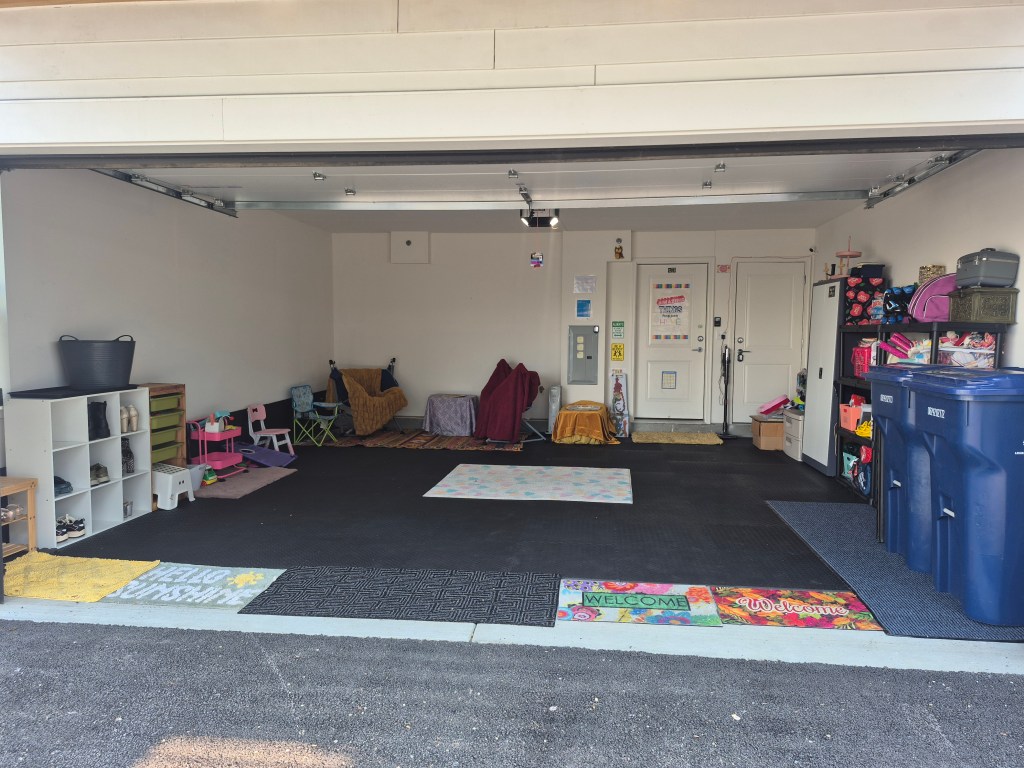
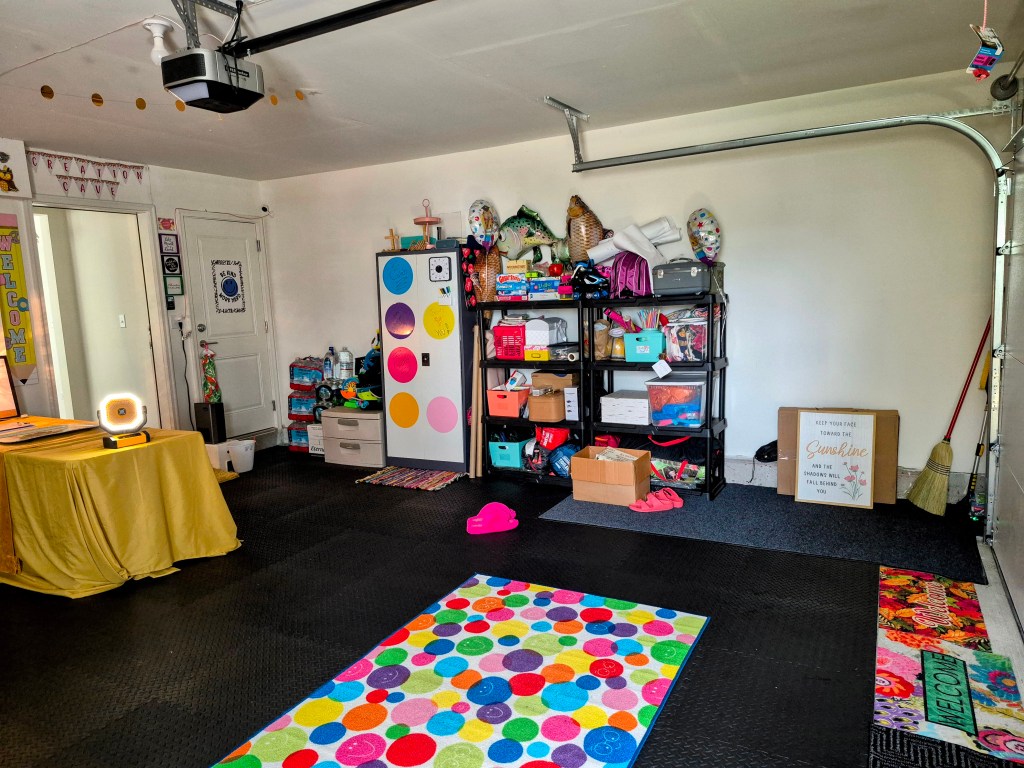
Let me get you up to speed on what is in the garage now!
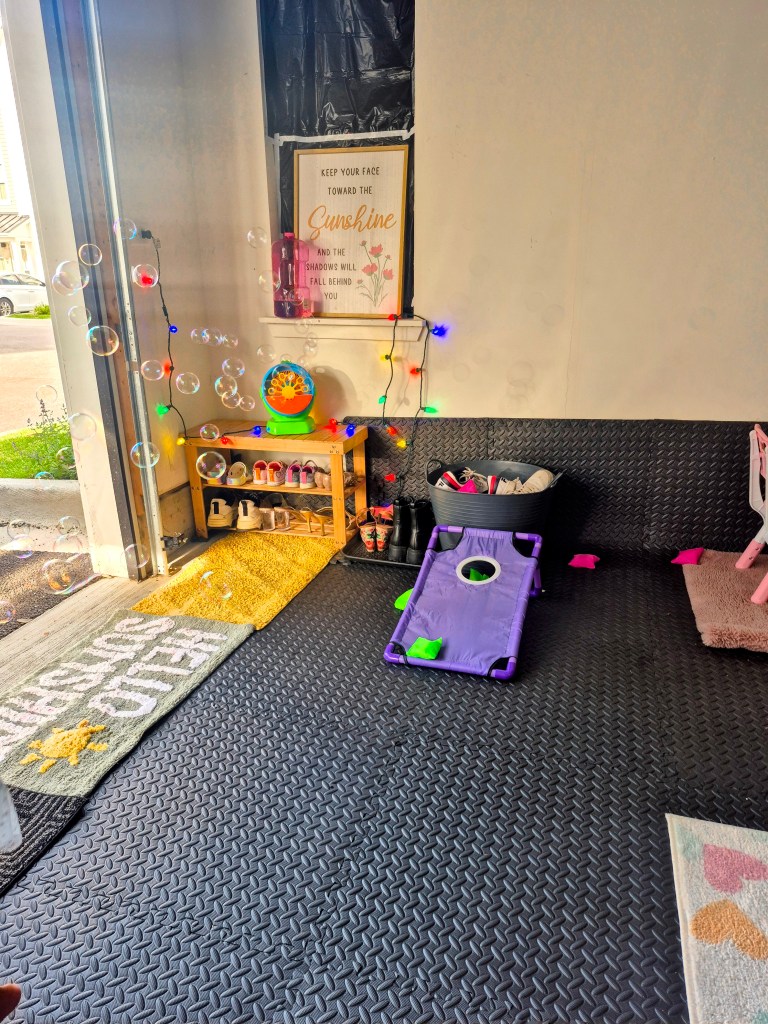
Along the left side is a bench and 9 cubed storage unit – for shoes. Theses were secured from Savers! The vertical storage with the green bins was also secured from saver. I like this item because I can use it like a mini podium and/or small work space for creating – I can stand or sit on a bar height stool. Right now the green bins – contain misc. items. Next to that , is a pink rug with toys on it. That is a small play area for my daughter, Queen Glory. Her toys are stored in a mini bright pink cart.
Along the back wall, is a rug from Morocco – which goes in my bedroom, but was in the garage temporarily. On top of that are swinging hammock chairs that I got from Aldi a year-ish ago! These used to be on my balcony and are now in the garage for us to sit on. I keep throw blankets on them for when we want to be extra cozy and comfy. That grey table between the chairs is actually a storage bin with a table cloth over it.
Lo Tip: If you don’t have a side table, want to hide storage items, and/or are on a tight budget. Take a storage bin and throw a cloth over it. To make it even fancier, place a tray on top to hold food and goodies.
What is that mini gold cloth table?!? You already know, hehehe. A covered storage bin!
Along the right wall, is storage and the curbside trash + recycle containers. Again, I have those containers on top of an industrial rug to catch any outdoor gunk and to protect the black gym floor tiles.
Lo Tip: Purchase a cordless brushless vacuum to keep gym floor tiles clean. This prevents scratching and makes for quick clean ups.
For security and stalking purposes, I have a security camera mounted in the back upper right corner. I am able to observe activity from my phone and speak into that space to get my kids attention. It is important for me to see the entry points of all spaces of The Billionaire Bubble, including the garage.
Now this is where we get to the really really fun part of this transformation:
Decorating
While this garage transformation was underway I was getting my daily 10k steps at one of my favorite stores, Hobby Lobby! I came up on a section that had me over the moon! It was their teacher/classroom aisle! As I walked it, I couldn’t help to smile! I let it marinate and came back another day to grab a cart and stack a pile of goodies into it for The Creation Cave! A woman behind me, heard the final price at checkout and remarked, “I hope this is for a business!”. I responded:
God’s Plan
Unfortunately, my phone was dead so I couldn’t take a picture of the 2 carts I rolled out with. Here are the items dumped out at my dwelling space!
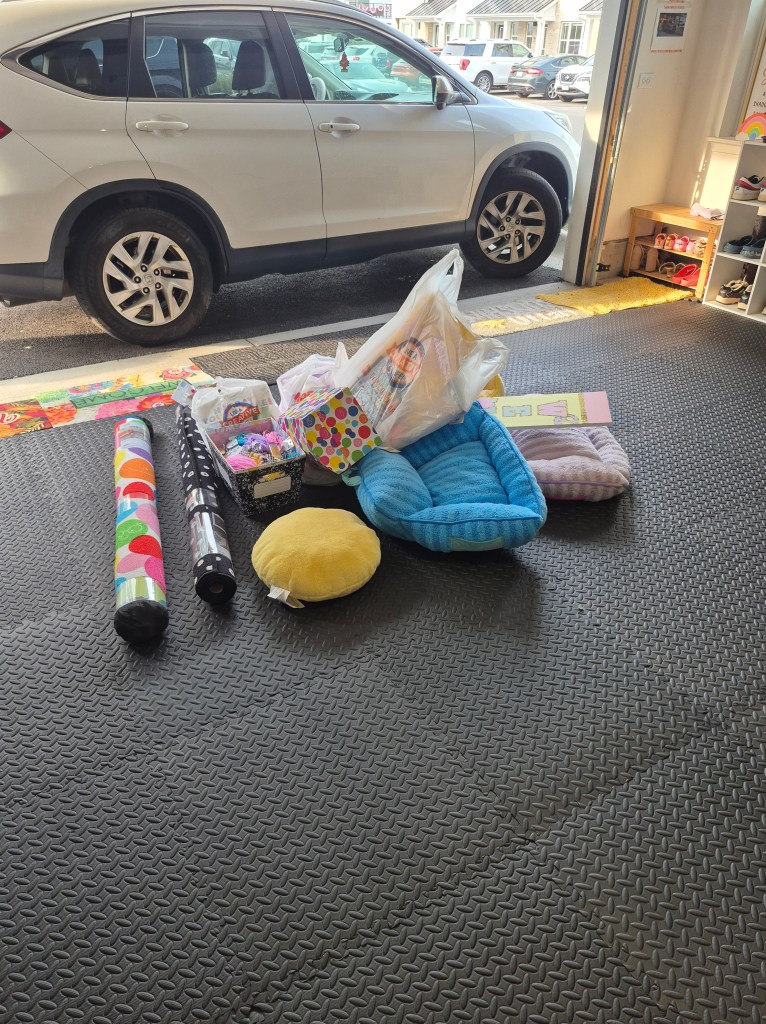
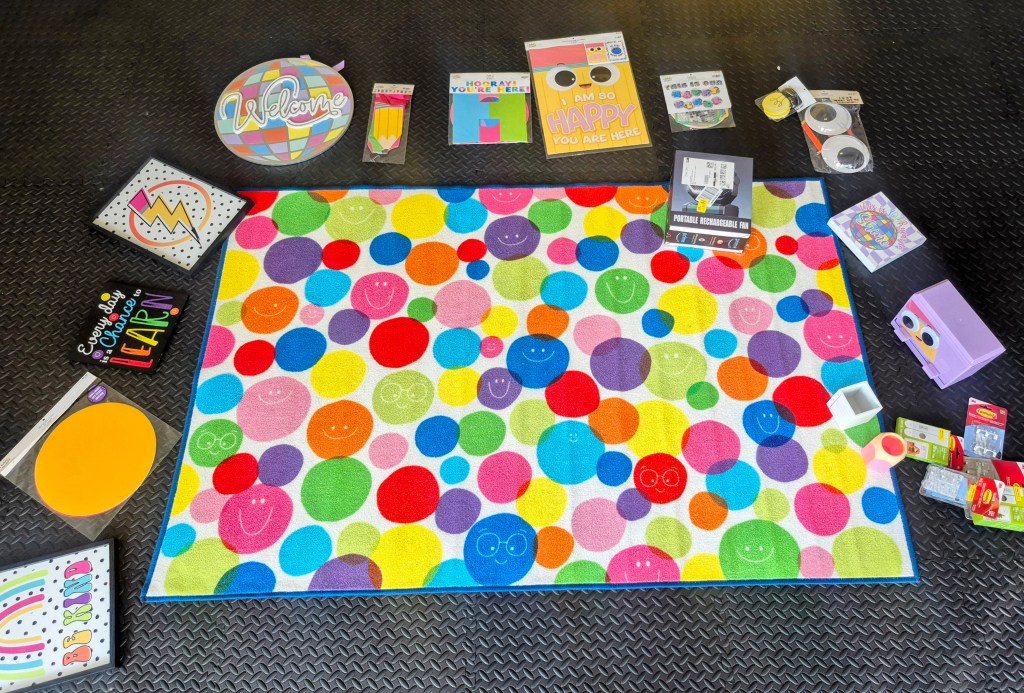
Told you that aisle made me smile! I’ve got a bright smiley face and googly eye theme going on here!
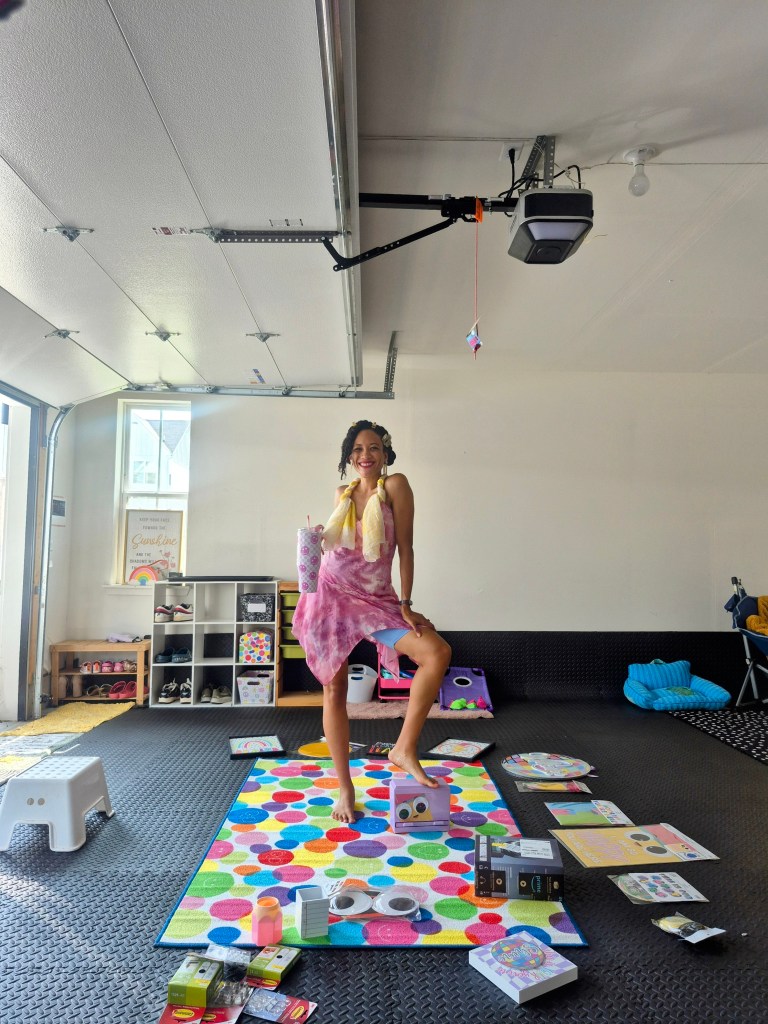
Fashion Feature!
To get into this joyous task of decorating – I decided to style myself to match the color scheme of the pencil earrings and hair clips I picked up on my Hobby Lobby shopping trip!
Lo Tip: Want to give a dress some extra umph!?! Take a silk scarf and wrap it around your dress straps! It will give your dress a whimsical upgrade. (Subscribe to LonisaMari.com (blog) for in depth styling tips)


After styling myself like a pencil, I made it to The Creation Cave to get to giggling, taping, and hanging!
As with all creative projects, I flow with The Holy Spirit! I got to moving and letting the creativity flow within a time constraint. I operate best using the Pomodoro Technique – where I work in short bursts. This helps me to get through the this is “too hard” or “too much” mental roadblocks and get into a flow state, where I don’t want to stop!
Lo Tip: To keep yourself focused on tasks, keep timers in your creative, action zones. Get timers with stands and magnets! Consider keeping timers throughout your dwelling space, in the following areas: kitchen, bathrooms, offices, and playrooms. We don’t need more time to get stuff done, but more focus!
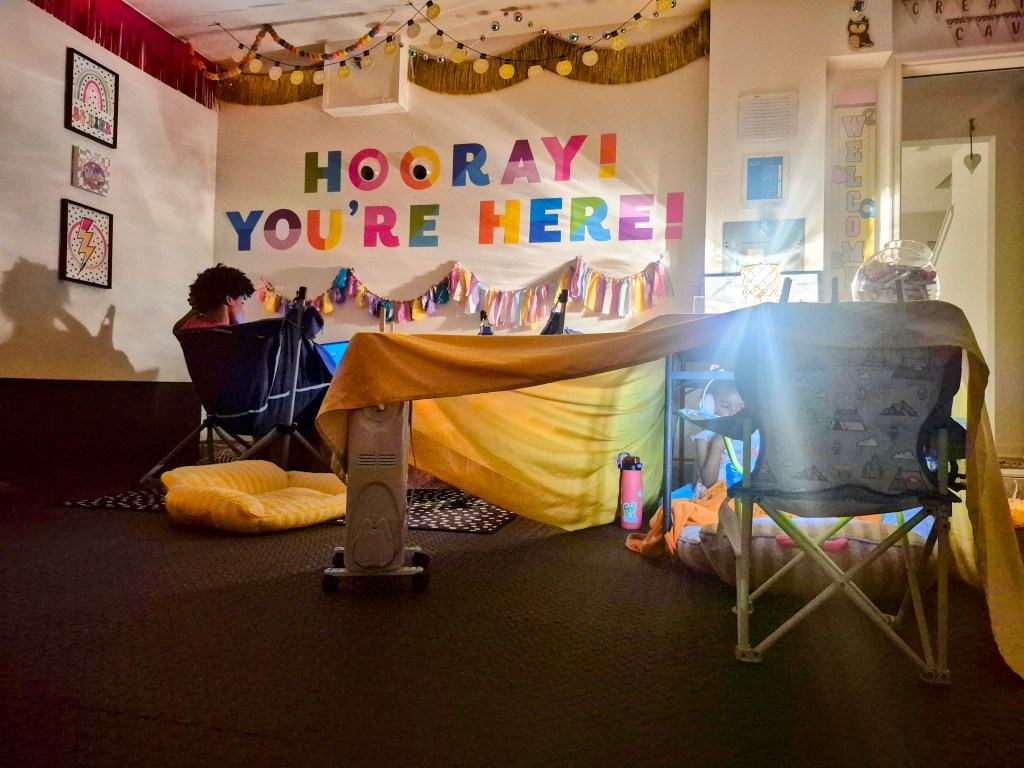
From Hobby Lobby, I picked up signs and paper decoration kits with cute phrases. I used one of the paper decoration kits to create a statement wall! To adhere the kit, I used double sided tape. I was concerned that these would not stick due to temperature fluctuations in the garage! They have held up well!
I draped garland strands to the wall and ceiling using 3M hooks, may have been knockoffs, but you get the gist.

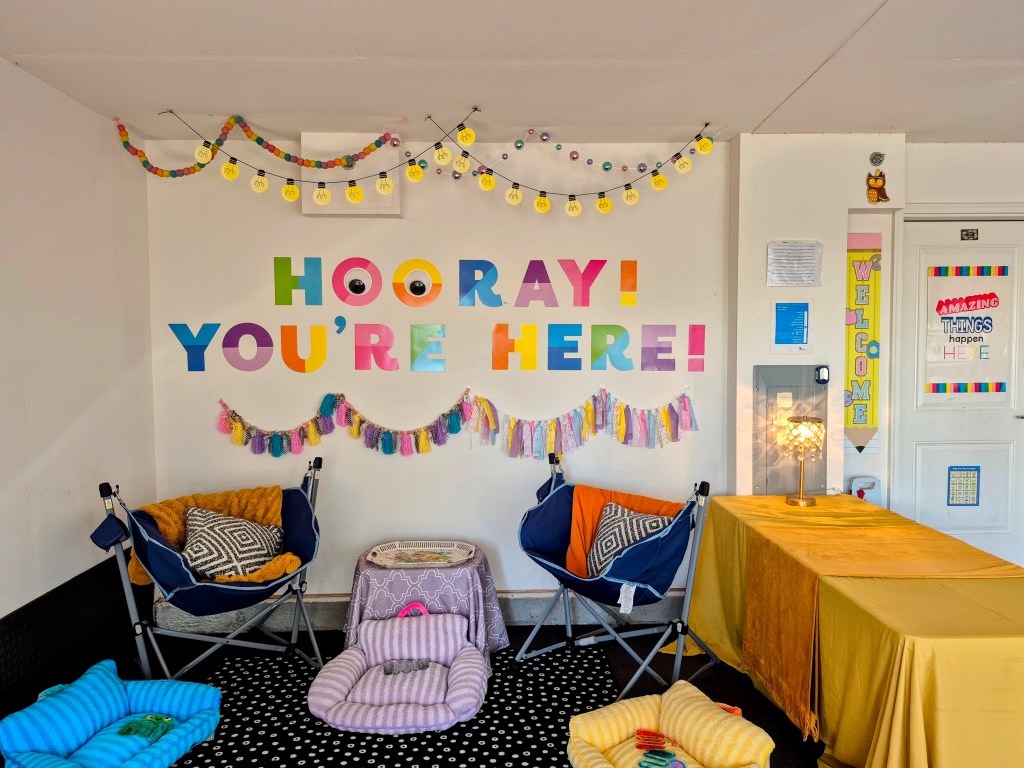
Isn’t this space lit!?!? I just love it so much! Those colorful floor cushions you see are actually:
Pet Beds
bahahaha, just imagine that my kids were arguing over which one they wanted! They were fussing about a pet bed! My boys found out tonight that these were pet beds. You think that is somethin?

I slept across the pet beds last night! Before you get in a tizzy, these pet beds are brand new and from Hobby Lobby! They were half off and matched the bright color theme for The Creation Cave!
This table with the gold drapings is actually foldable and was formerly used as a desk for my office. I upgraded my office, by thrifting a $10 desk for myself. This enabled me to move the foldable table into The Creation Cave. The gold drapings are a repurposed bed sheet and velvet curtain. The lamp used to be in a former office and is now used to provide a soft, dim light for chill nights. This table serves many needs, but one of the current favorites is a:
Fort
I take pet beds put them underneath the table, grab a fan lamp, and clip the sheet to items in the garage using clothespins. There is a tray that sits on top of a tucked away storage bin for the kids to put their drinks and snacks!
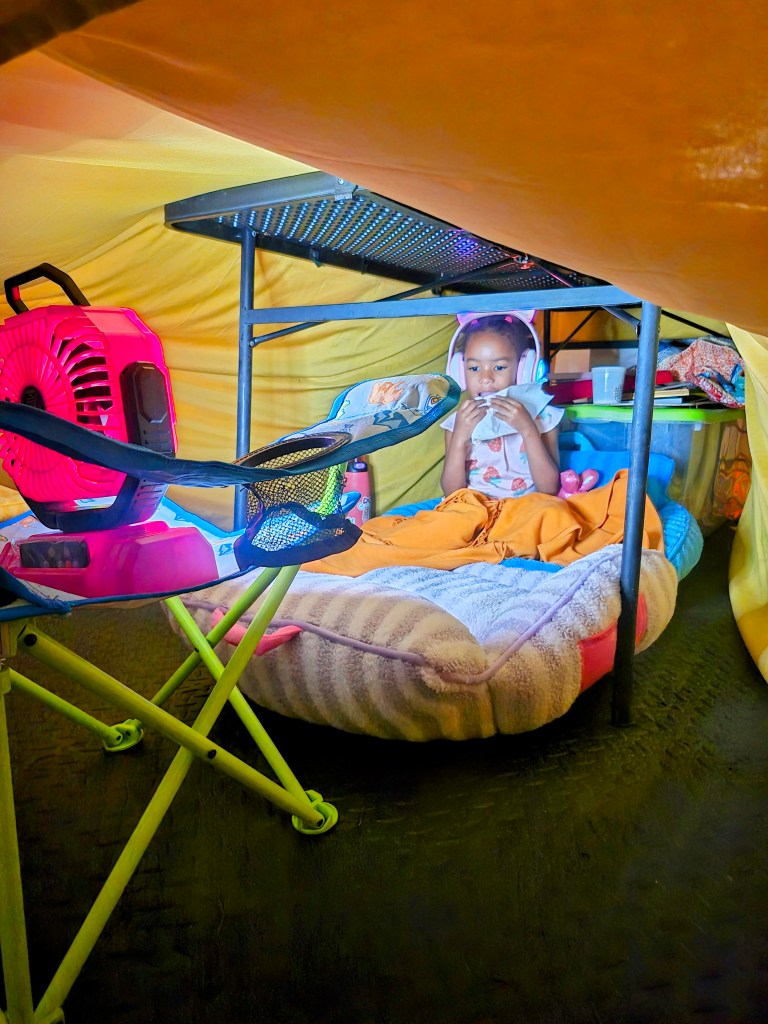
Do you want to come over and hideout from the cray in the world?
Better yet, are you feeling inspired to transform your garage?!? I hope so. 🙂
When I am designing a space, I go in with my vision then observe how people use it naturally. I never thought of the table as a fort spot, the kids did that naturally. As a result, I cleared out some decor that I had hidden underneath the table to make room for them to have a fort.
Let’s zone out and look at The Creation Cave!

My kids really enjoy this space, as do I! My first born son, King Caleb, thanked me for creating this space for them! It’s of his fave spots! Which means a lot to my mama heart.
We hang in here individually and collectively! Getting lots of giggles out on the smiley face rug, playing games!
I hope this transformation encourages you to consider transforming your garage into a hangout spot that suits you and your fam bam! If you have any questions, drop a comment below so I can help you on your journey.
Stay PlayFULL,


FYI: BLOG POST UNDER CONSTRUCTION – More vids to be uploaded 6.25.25.

One thought on “DIY Garage Transformation”